Introduction
| info |
Information The MoEngage Destination in Adobe doesn't currently support Unified Identity (Identity Resolution) or Portfolio for user and segment sync. |
MoEngage and Adobe RT CDP integration allows you to connect and map their Adobe data (user attributes, segments and events) to MoEngage in real-time. Customers can then act on this data, delivering personalized, targeted experience.
With Adobe, the integration is very simple and intuitive. Simply take any Adobe user profile, and map it to a MoEngage user attributes.
Integration Prerequisites
- Access to your MoEngage and Adobe Experience platform.
- The Data API ID and Data API Key are available in the moEngage dashboard. You can access the Data API ID in Settings -> Account -> APIs . The Data API ID is the same as the Workspace ID. The Data API Key is available in the same screen in the API Keys -> Data section.
- MoEngage data cluster.
Step 1: Configure MoEngage destination
- On your Adobe platform, navigate to Connections > Destinations.
- Search for MoEngage. Click Configure.
-
Enter the following details about your MoEngage platform
Field Action Username Copy and paste the Data API ID. The Data API ID and the Workspace ID of your MoEngage account are the same.
The Workspace ID of your MoEngage account is available at Settings -> Account -> APIs -> Workspace ID.
Password Copy and paste the Data API Key of your MoEngage account, which is available at Settings -> Account -> APIs -> API keys > Data API settings. - Click Connect to destination.
Step 2: Create destination
- Click Create destination.
- Your destination has now been created. You can click Save & Exit to activate segments later or Next to continue the workflow and select segments to activate.
Step 3: Select segments
Activate the data you have in the Adobe real-time CDP by mapping segments to the MoEngage destination.
- Select and activate the MoEngage destination.
- Select applicable segments.
- Click Next.
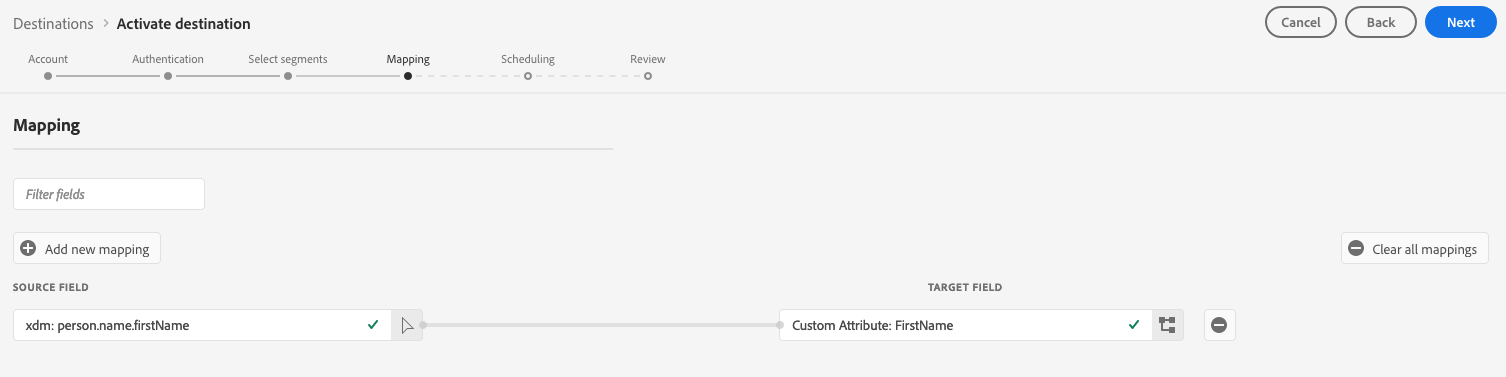
Step 4: Mappings
To correctly send your audience data from the Adobe Experience Platform to MoEngage, you must complete the field mapping step. Mapping creates a link between the Adobe Experience data model fields and the corresponding MoEngage user attributes.
- In the mapping step, click Add new mapping.
- In the source field section, click the arrow button next to the empty field; this will open the select source field window.
- In this window, you must select Adobe attributes to map to your MoEngage attributes.
- Next, you must select the identity namespace. This option is used to map a platform identity namespace to a MoEngage identifier.
- In the select target field window, you can choose between three categories of target fields:
• Select identity namespace: Use this option to map Platform identity namespaces to MoEngage user identifier.
• Select custom attributes: Use this option to map Adobe XDM attributes to custom MoEngage user attributes attributes that you defined on your MoEngage account.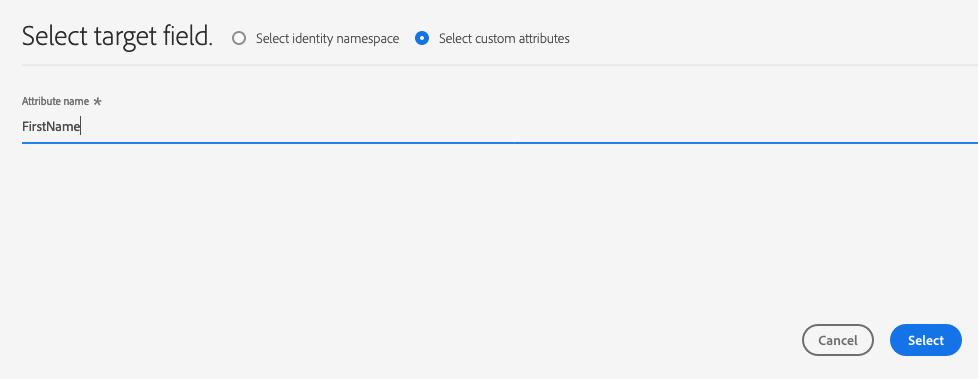
You can also use this option to rename existing XDM attributes into MoEngage. For example, mapping afirstnameXDM attribute to a customFirst_Nameattribute in MoEngage, will create theFirst_Nameattribute in MoEngage if it doesn’t already exist, and map thefirstnameXDM attribute to it.
Choose your target fields, then click Select.
Note that AEPSegments is a user attribute that will be automatically created in MoEngage and will contain all audience name that the user belongs to in AEP in an array format. You do not need to add a mapping for this step.
- You should now see your field mapping in the list.
- To add more mappings, repeat steps 1 through 6, as necessary.
- Review and click Finish.
Step 5: View users and attributes on MoEngage
To verify if data has been exported successfully to your MoEngage workspace, go to the user profile on your MoEngage account. Here, you should find a user attribute named AEPSegments created automatically and the other custom attributes that have been mapped in the earlier steps in Adobe Experience Platform.
AEPSegments is an array type attribute in MoEngage. It lists all of the Adobe audience names the user is associated with in Adobe Experience Platform.
Rate Limits
To ensure platform stability, MoEngage supports a maximum ingestion rate of 500 requests per second (RPS) for Adobe data.
If requests exceed this limit, MoEngage returns a 429 (Too Many Requests) status code. Although Adobe includes built-in logic to automatically retry requests upon receiving this code, note the following:
- Custom retry policies: If your implementation requires a custom retry policy or specific back-off logic, you must contact the Adobe Support Team for configuration.
- Failed deliveries: If Adobe exhausts its retry attempts, contact Adobe Support to replay the data. MoEngage cannot replay data that was not successfully ingested.
Refer to Adobe's default retry policy to understand how rate limiting affects your data flow. For more information, see the Adobe Experience Platform documentation.
FAQs?
Q: Why am I seeing data loss - the users in MoEngage is less than than the users on RT CDP?
Ans: When enabling the audience for the first time, Adobe sends data in sudden bursts. Once the limits are breached, MoEngage system starts throwing 429 for Adobe to retry these failures.
You should reach out to your Adobe RT CDP customer support team to enable the retries with exponential backoff for your MoEngage destination. This will ensure any failures are retried automatically.
Note- This works well for a audience with upto 6M users. If your adobe audience has >6M users, please reach out to MoEngage support team.